GitLab Container Registry
- Introduced in GitLab 8.8.
- Docker Registry manifest
v1support was added in GitLab 8.9 to support Docker versions earlier than 1.10.- Starting from GitLab 8.12, if you have 2FA enabled in your account, you need to pass a personal access token instead of your password in order to login to GitLab's Container Registry.
- Multiple level image names support was added in GitLab 9.1.
- The group level Container Registry was introduced in GitLab 12.10.
- Searching by image repository name was introduced in GitLab 13.0.
NOTE: Note: This document is the user guide. To learn how to enable GitLab Container Registry across your GitLab instance, visit the administrator documentation.
With the Docker Container Registry integrated into GitLab, every project can have its own space to store its Docker images.
You can read more about Docker Registry at https://docs.docker.com/registry/introduction/.
Enable the Container Registry for your project
CAUTION: Warning: The Container Registry follows the visibility settings of the project. If the project is public, so is the Container Registry.
If you cannot find the Packages & Registries > Container Registry entry under your project's sidebar, it is not enabled in your GitLab instance. Ask your administrator to enable GitLab Container Registry following the administration documentation.
If you are using GitLab.com, this is enabled by default so you can start using the Registry immediately. Currently there is a soft (10GB) size restriction for Registry on GitLab.com, as part of the repository size limit.
Once enabled for your GitLab instance, to enable Container Registry for your project:
- Go to your project's Settings > General page.
- Expand the Visibility, project features, permissions section and enable the Container Registry feature on your project. For new projects this might be enabled by default. For existing projects (prior GitLab 8.8), enable it explicitly.
- Press Save changes for the changes to take effect. You should now be able to see the Packages & Registries > Container Registry link in the sidebar.
Control Container Registry from within GitLab
GitLab offers a simple Container Registry management panel. This management panel is available for both projects and groups.
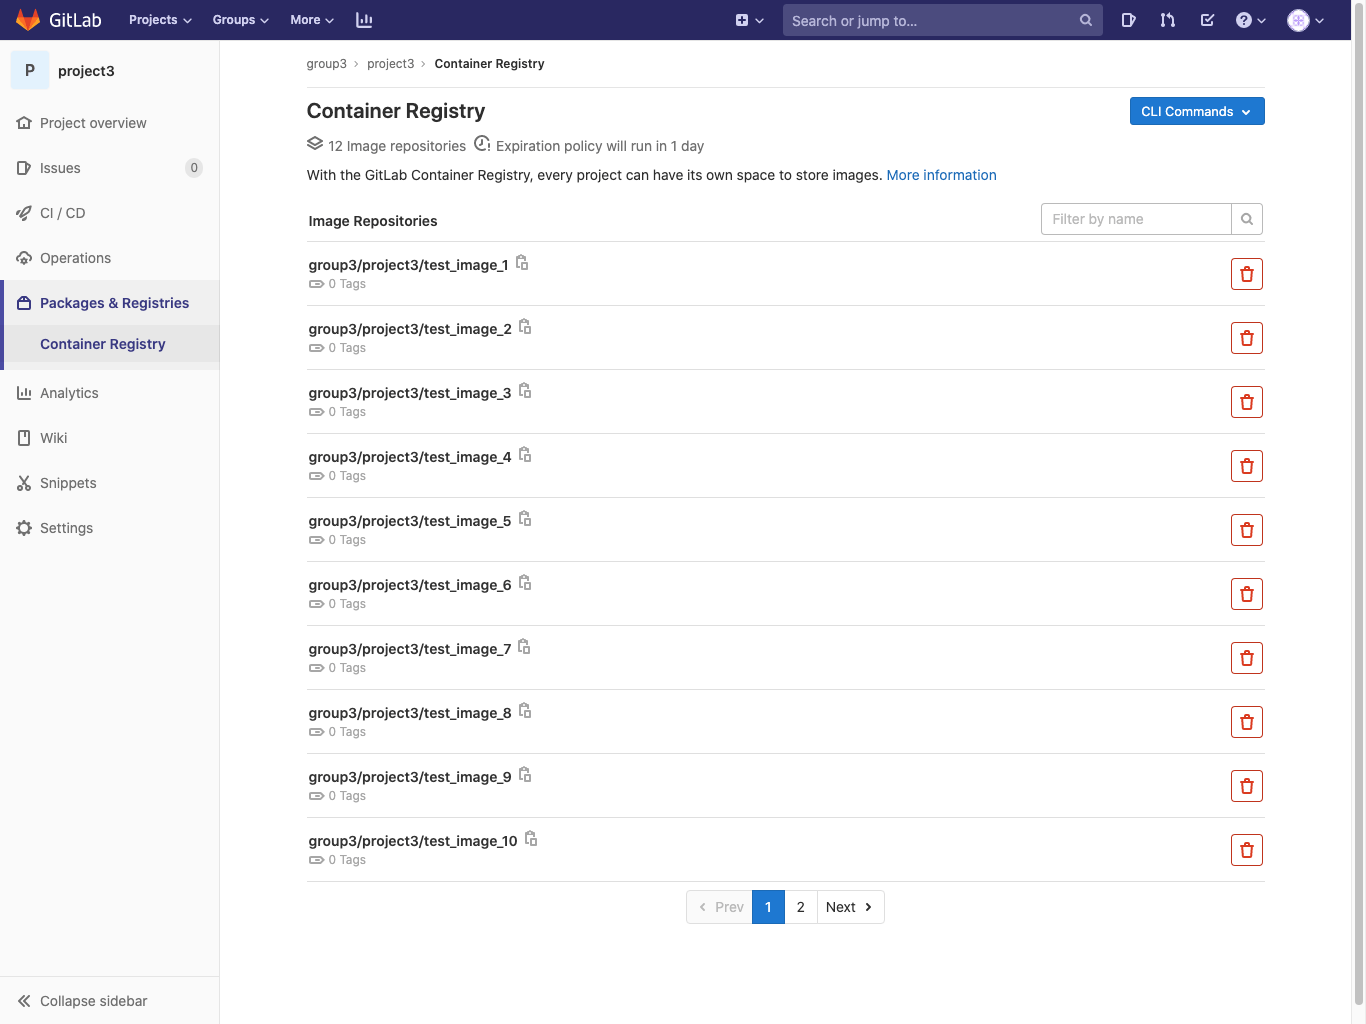
Control Container Registry for your project
Navigate to your project's {package} Packages & Registries > Container Registry.
This view allows you to:
- Show all the image repositories that belong to the project.
- Filter image repositories by their name.
- Delete one or more image repository.
- Navigate to the image repository details page.
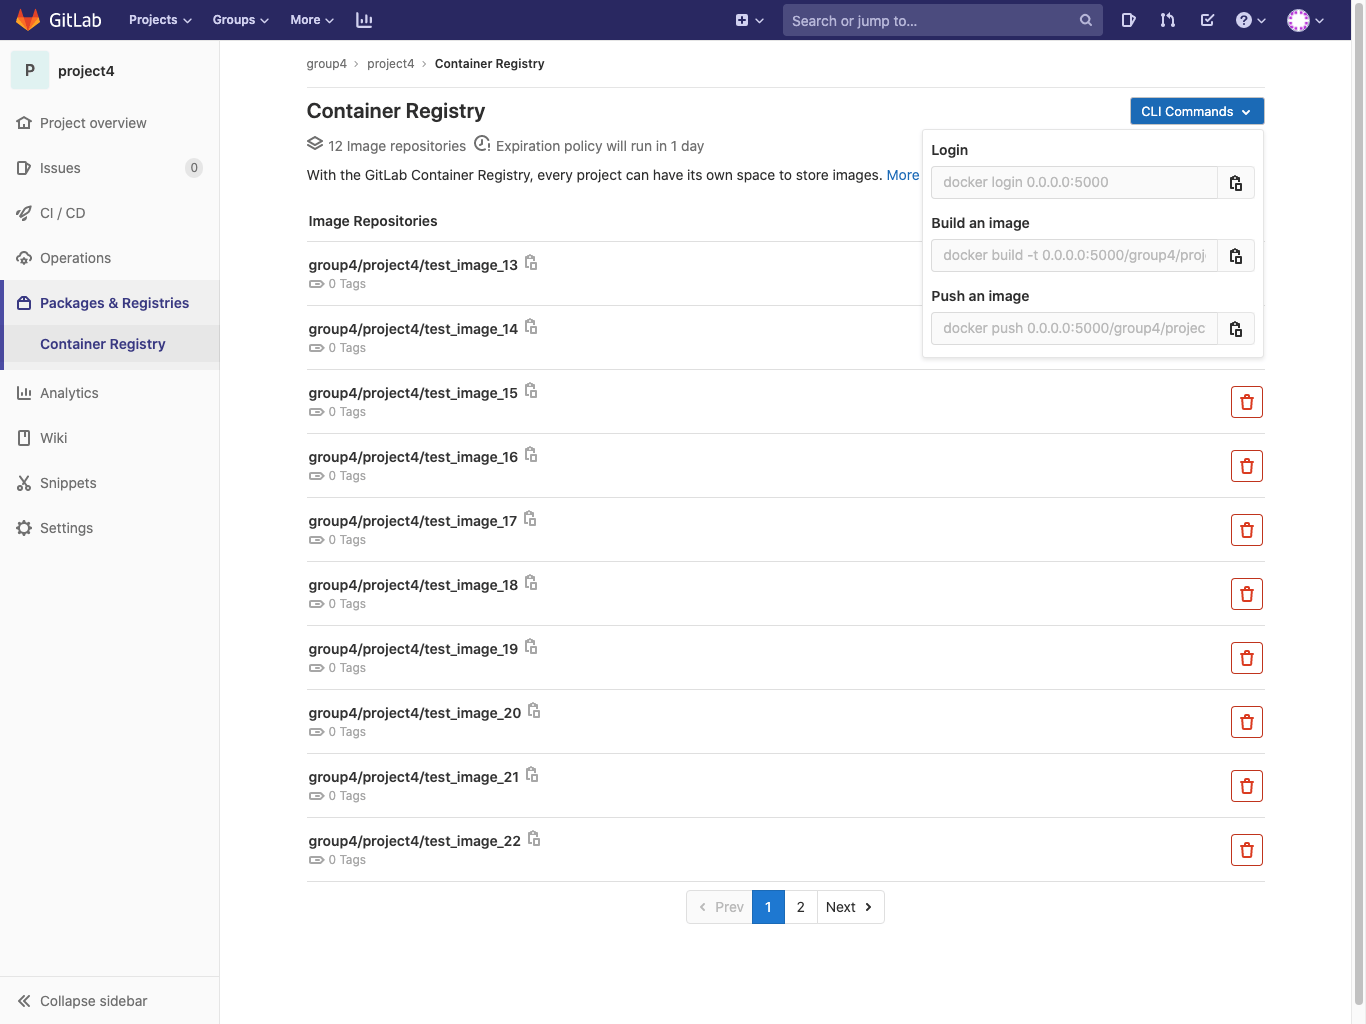
- Show a Quick start dropdown with the most common commands to log in, build and push.
- Show a banner if the optional cleanup policy is enabled for this project.
Control Container Registry for your group
Navigate to your group's {package} Packages & Registries > Container Registry.
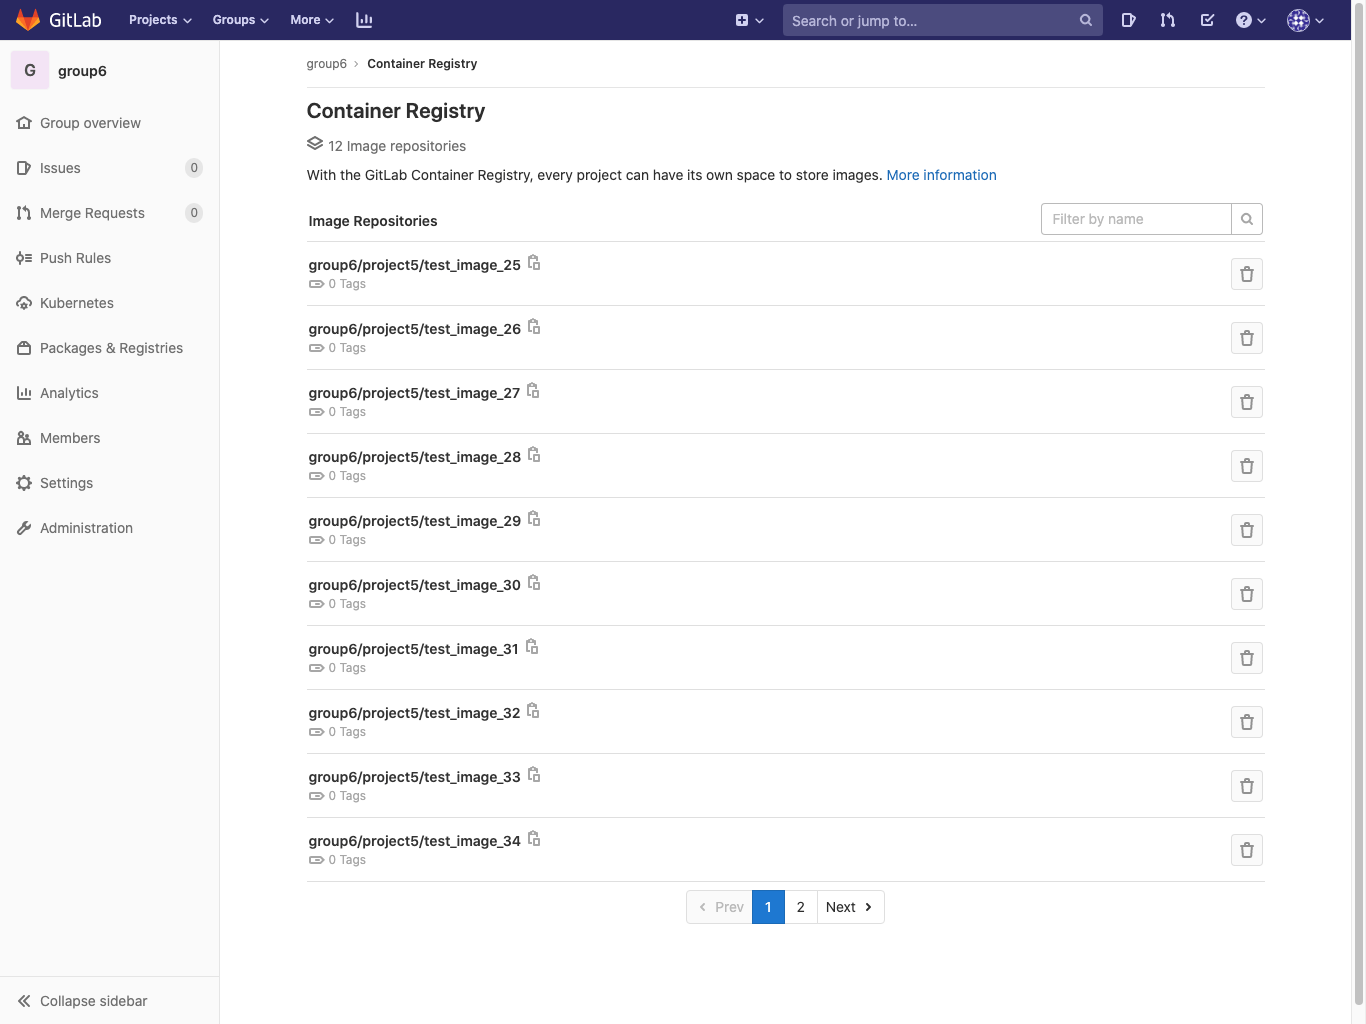
This view allows you to:
- Show all the image repositories of the projects that belong to this group.
- Delete one or more image repositories.
- Navigate to a specific image repository details page.
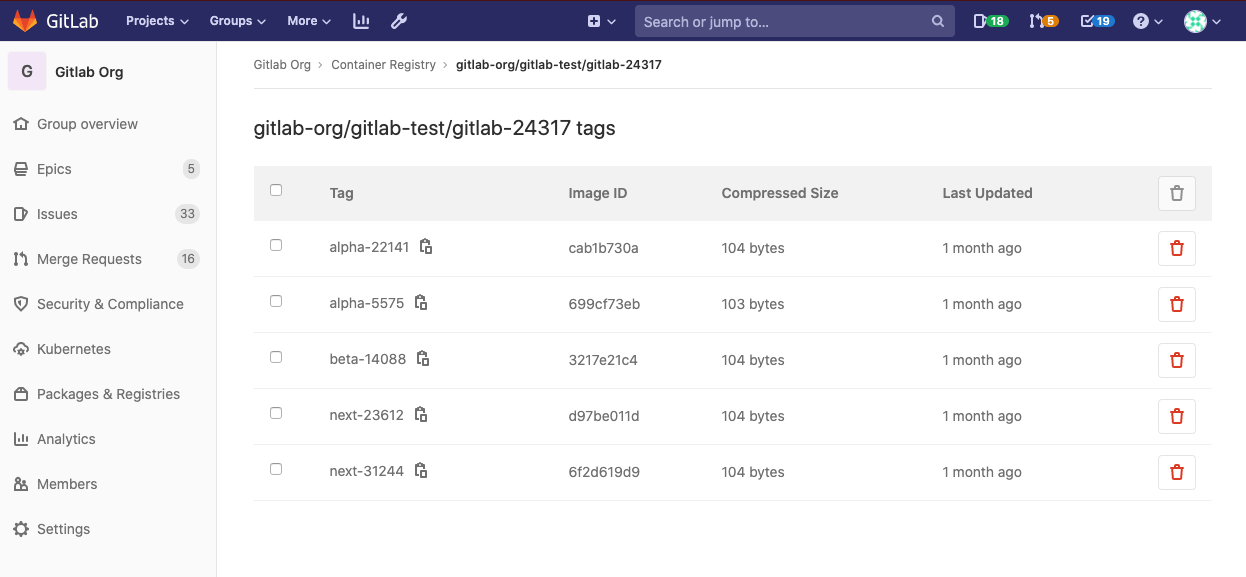
Image Repository details page
Clicking on the name of any image repository navigates to the details.
NOTE: Note: The following page has the same functionalities both in the Group level container registry and in the Project level container registry.
This view:
- Shows all the image repository details.
- Shows all the tags of the image repository.
- Allows you to quickly copy the tag path (by clicking on the clipboard button near the tag name).
- Allows you to delete one or more tags.
Use images from GitLab Container Registry
To download and run a container from images hosted in GitLab Container Registry,
use docker run:
docker run [options] registry.example.com/group/project/image [arguments]For more information on running Docker containers, visit the Docker documentation.
Authenticating to the GitLab Container Registry
If you visit the Packages & Registries > Container Registry link under your project's menu, you can see the explicit instructions to login to the Container Registry using your GitLab credentials.
For example if the Registry's URL is registry.example.com, then you should be
able to login with:
docker login registry.example.comNOTE: Note: If you have 2 Factor Authentication enabled in your account, you need to pass a personal access token instead of your password in order to login to GitLab's Container Registry.
Credentials must be provided for authorization to any non-public registry. Only project members can access private, GitLab-hosted registries.
There are two ways to authenticate:
- By using a personal access token.
- By using a deploy token.
The minimum scope needed for both of them is read_registry.
Example of using a token:
docker login registry.example.com -u <username> -p <token>Build and push images from your local machine
Building and publishing images should be a straightforward process. Just make sure that you are using the Registry URL with the namespace and project name that is hosted on GitLab:
docker build -t registry.example.com/group/project/image .
docker push registry.example.com/group/project/image
Your image is named after the following scheme:
<registry URL>/<namespace>/<project>/<image>GitLab supports up to three levels of image repository names. The following examples of image tags are valid:
registry.example.com/group/project:some-tag
registry.example.com/group/project/image:latest
registry.example.com/group/project/my/image:rc1
Build and push images using GitLab CI/CD
While you can build and push your images from your local machine, take full advantage of the Container Registry by combining it with GitLab CI/CD. You can then create workflows and automate any processes that involve testing, building, and eventually deploying your project from the Docker image you created.
Before diving into the details, some things you should be aware of:
- You must authenticate to the container registry
before running any commands. You can do this in the
before_scriptif multiple jobs depend on it. - Using
docker build --pullfetches any changes to base images before building in case your cache is stale. It takes slightly longer, but it means you don’t get stuck without security patches for base images. - Doing an explicit
docker pullbefore eachdocker runfetches the latest image that was just built. This is especially important if you are using multiple runners that cache images locally. Using the Git SHA in your image tag makes this less necessary since each job is unique and you shouldn't ever have a stale image. However, it's still possible to have a stale image if you re-build a given commit after a dependency has changed. - You don't want to build directly to
latesttag in case there are multiple jobs happening simultaneously.
Authenticating to the Container Registry with GitLab CI/CD
There are three ways to authenticate to the Container Registry via GitLab CI/CD:
-
Using the special
CI_REGISTRY_USERvariable: The user specified by this variable is created for you in order to push to the Registry connected to your project. Its password is automatically set with theCI_REGISTRY_PASSWORDvariable. This allows you to automate building and deploying your Docker images and has read/write access to the Registry. This is ephemeral, so it's only valid for one job. You can use the following example as-is:docker login -u $CI_REGISTRY_USER -p $CI_REGISTRY_PASSWORD $CI_REGISTRY -
Using the GitLab Deploy Token: You can create and use a special deploy token with your projects. Once created, you can use the special environment variables, and GitLab CI/CD fills them in for you. You can use the following example as-is:
docker login -u $CI_DEPLOY_USER -p $CI_DEPLOY_PASSWORD $CI_REGISTRY -
Using a personal access token: You can create and use a personal access token in case your project is private:
- For read (pull) access, the scope should be
read_registry. - For write (push) access, the scope should be
write_registry.
Replace the
<username>and<access_token>in the following example:docker login -u <username> -p <access_token> $CI_REGISTRY - For read (pull) access, the scope should be
Container Registry examples with GitLab CI/CD
If you're using Docker-in-Docker on your runners, this is how your .gitlab-ci.yml
should look:
build:
  image: docker:19.03.12
  stage: build
  services:
    - docker:19.03.12-dind
  script:
    - docker login -u $CI_REGISTRY_USER -p $CI_REGISTRY_PASSWORD $CI_REGISTRY
    - docker build -t $CI_REGISTRY/group/project/image:latest .
    - docker push $CI_REGISTRY/group/project/image:latest
You can also make use of other variables to avoid hard-coding:
build:
  image: docker:19.03.12
  stage: build
  services:
    - docker:19.03.12-dind
  variables:
    IMAGE_TAG: $CI_REGISTRY_IMAGE:$CI_COMMIT_REF_SLUG
  script:
    - docker login -u $CI_REGISTRY_USER -p $CI_REGISTRY_PASSWORD $CI_REGISTRY
    - docker build -t $IMAGE_TAG .
    - docker push $IMAGE_TAG
Here, $CI_REGISTRY_IMAGE would be resolved to the address of the registry tied
to this project. Since $CI_COMMIT_REF_NAME resolves to the branch or tag name,
and your branch name can contain forward slashes (for example, feature/my-feature), it is
safer to use $CI_COMMIT_REF_SLUG as the image tag. This is due to that image tags
cannot contain forward slashes. We also declare our own variable, $IMAGE_TAG,
combining the two to save us some typing in the script section.
Here's a more elaborate example that splits up the tasks into 4 pipeline stages,
including two tests that run in parallel. The build is stored in the container
registry and used by subsequent stages, downloading the image
when needed. Changes to master also get tagged as latest and deployed using
an application-specific deploy script:
image: docker:19.03.12
services:
  - docker:19.03.12-dind

stages:
  - build
  - test
  - release
  - deploy

variables:
  # Use TLS https://docs.gitlab.com/ee/ci/docker/using_docker_build.html#tls-enabled
  DOCKER_HOST: tcp://docker:2376
  DOCKER_TLS_CERTDIR: "/certs"
  CONTAINER_TEST_IMAGE: $CI_REGISTRY_IMAGE:$CI_COMMIT_REF_SLUG
  CONTAINER_RELEASE_IMAGE: $CI_REGISTRY_IMAGE:latest

before_script:
  - docker login -u $CI_REGISTRY_USER -p $CI_REGISTRY_PASSWORD $CI_REGISTRY

build:
  stage: build
  script:
    - docker build --pull -t $CONTAINER_TEST_IMAGE .
    - docker push $CONTAINER_TEST_IMAGE

test1:
  stage: test
  script:
    - docker pull $CONTAINER_TEST_IMAGE
    - docker run $CONTAINER_TEST_IMAGE /script/to/run/tests

test2:
  stage: test
  script:
    - docker pull $CONTAINER_TEST_IMAGE
    - docker run $CONTAINER_TEST_IMAGE /script/to/run/another/test

release-image:
  stage: release
  script:
    - docker pull $CONTAINER_TEST_IMAGE
    - docker tag $CONTAINER_TEST_IMAGE $CONTAINER_RELEASE_IMAGE
    - docker push $CONTAINER_RELEASE_IMAGE
  only:
    - master

deploy:
  stage: deploy
  script:
    - ./deploy.sh
  only:
    - master
NOTE: Note:
This example explicitly calls docker pull. If you prefer to implicitly pull the
built image using image:, and use either the Docker
or Kubernetes executor,
make sure that pull_policy
is set to always.
Using a Docker-in-Docker image from your Container Registry
To use your own Docker images for Docker-in-Docker, follow these steps in addition to the steps in the Docker-in-Docker section:
- Update the
imageandserviceto point to your registry. - Add a service alias.
Below is an example of what your .gitlab-ci.yml should look like:
 build:
   image: $CI_REGISTRY/group/project/docker:19.03.12
   services:
     - name: $CI_REGISTRY/group/project/docker:19.03.12-dind
       alias: docker
   stage: build
   script:
     - docker build -t my-docker-image .
     - docker run my-docker-image /script/to/run/tests
If you forget to set the service alias, the docker:19.03.12 image is unable to find the
dind service, and an error like the following is thrown:
error during connect: Get http://docker:2376/v1.39/info: dial tcp: lookup docker on 192.168.0.1:53: no such hostDelete images
You can delete images from your Container Registry in multiple ways.
CAUTION: Warning: Deleting images is a destructive action and can't be undone. To restore a deleted image, you must rebuild and re-upload it.
NOTE: Note: Administrators should review how to garbage collect the deleted images.
Delete images from within GitLab
To delete images from within GitLab:
-
Navigate to your project's or group's {package} Packages & Registries > Container Registry.
-
From the Container Registry page, you can select what you want to delete, by either:
- Deleting the entire repository, and all the tags it contains, by clicking the red {remove} Trash icon.
- Navigating to the repository, and deleting tags individually or in bulk by clicking the red {remove} Trash icon next to the tag you want to delete.
-
In the dialog box, click Remove tag.

Delete images using the API
If you want to automate the process of deleting images, GitLab provides an API. For more information, see the following endpoints:
- Delete a Registry repository
- Delete an individual Registry repository tag
- Delete Registry repository tags in bulk
Delete images using GitLab CI/CD
CAUTION: Warning: GitLab CI/CD doesn't provide a built-in way to remove your images, but this example uses a third-party tool called reg that talks to the GitLab Registry API. You are responsible for your own actions. For assistance with this tool, see the issue queue for reg.
The following example defines two stages: build, and clean. The
build_image job builds the Docker image for the branch, and the
delete_image job deletes it. The reg executable is downloaded and used to
remove the image matching the $CI_PROJECT_PATH:$CI_COMMIT_REF_SLUG
environment variable.
To use this example, change the IMAGE_TAG variable to match your needs:
stages:
  - build
  - clean

build_image:
  image: docker:19.03.12
  stage: build
  services:
    - docker:19.03.12-dind
  variables:
    IMAGE_TAG: $CI_REGISTRY_IMAGE:$CI_COMMIT_REF_SLUG
  script:
    - docker login -u $CI_REGISTRY_USER -p $CI_REGISTRY_PASSWORD $CI_REGISTRY
    - docker build -t $IMAGE_TAG .
    - docker push $IMAGE_TAG
  only:
    - branches
  except:
    - master

delete_image:
  image: docker:19.03.12
  stage: clean
  services:
    - docker:19.03.12-dind
  variables:
    IMAGE_TAG: $CI_PROJECT_PATH:$CI_COMMIT_REF_SLUG
    REG_SHA256: ade837fc5224acd8c34732bf54a94f579b47851cc6a7fd5899a98386b782e228
    REG_VERSION: 0.16.1
  before_script:
    - apk add --no-cache curl
    - curl --fail --show-error --location "https://github.com/genuinetools/reg/releases/download/v$REG_VERSION/reg-linux-amd64" --output /usr/local/bin/reg
    - echo "$REG_SHA256  /usr/local/bin/reg" | sha256sum -c -
    - chmod a+x /usr/local/bin/reg
  script:
    - /usr/local/bin/reg rm -d --auth-url $CI_REGISTRY -u $CI_REGISTRY_USER -p $CI_REGISTRY_PASSWORD $IMAGE_TAG
  only:
    - branches
  except:
    - master
TIP: Tip:
You can download the latest reg release from
the releases page, then update
the code example by changing the REG_SHA256 and REG_VERSION variables
defined in the delete_image job.
Delete images by using a cleanup policy
You can create a per-project cleanup policy to ensure older tags and images are regularly removed from the Container Registry.
Cleanup policy
- Introduced in GitLab 12.8.
- Renamed from "expiration policy" to "cleanup policy" in GitLab 13.2.
The cleanup policy is a scheduled job you can use to remove tags from the Container Registry. For the project where it's defined, tags matching the regex pattern are removed. The underlying layers and images remain.
To delete the underlying layers and images that aren't associated with any tags, administrators can use
garbage collection with the -m switch.
Enable the cleanup policy
Cleanup policies can be run on all projects, with these exceptions:
-
For GitLab.com, the project must have been created after 2020-02-22. Support for projects created earlier is planned.
-
For self-managed GitLab instances, the project must have been created in GitLab 12.8 or later. However, an administrator can enable the cleanup policy for all projects (even those created before 12.8) in GitLab application settings by setting
container_expiration_policies_enable_historic_entriesto true.There are performance risks with enabling it for all projects, especially if you are using an external registry.
How the cleanup policy works
The cleanup policy collects all tags in the Container Registry and excludes tags until only the tags to be deleted remain.
The cleanup policy:
- Collects all tags for a given repository in a list.
- Excludes the tag named
latestfrom the list. - Evaluates the
name_regex(tags to expire), excluding non-matching names from the list. - Excludes any tags that do not have a manifest (not part of the options in the UI).
- Orders the remaining tags by
created_date. - Excludes from the list the N tags based on the
keep_nvalue (Number of tags to retain). - Excludes from the list the tags more recent than the
older_thanvalue (Expiration interval). - Excludes from the list any tags matching the
name_regex_keepvalue (tags to preserve). - Finally, the remaining tags in the list are deleted from the Container Registry.
CAUTION: Warning: On GitLab.com, the execution time for the cleanup policy is limited, and some of the tags may remain in the Container Registry after the policy runs. The next time the policy runs, the remaining tags are included, so it may take multiple runs for all tags to be deleted.
Create a cleanup policy
You can create a cleanup policy in the API or the UI.
To create a cleanup policy in the UI:
-
For your project, go to Settings > CI/CD.
-
Expand the Cleanup policy for tags section.
-
Complete the fields.
Field Description Cleanup policy Turn the policy on or off. Expiration interval How long tags are exempt from being deleted. Expiration schedule How often the policy should run. Number of tags to retain How many tags to always keep for each image. Tags with names matching this regex pattern expire: The regex pattern that determines which tags to remove. For all tags, use .*. See other regex pattern examples.Tags with names matching this regex pattern are preserved: The regex pattern that determines which tags to preserve. The latesttag is always preserved. For all tags, use.*. See other regex pattern examples. -
Click Set cleanup policy.
Depending on the interval you chose, the policy is scheduled to run.
NOTE: Note: If you edit the policy and click Set cleanup policy again, the interval is reset.
Regex pattern examples
Cleanup policies use regex patterns to determine which tags should be preserved or removed, both in the UI and the API.
Here are examples of regex patterns you may want to use:
-
Match all tags:
.* -
Match tags that start with
v:v.+ -
Match tags that contain
master:master -
Match tags that either start with
v, containmaster, or containrelease:(?:v.+|master|release)
Use the cleanup policy API
You can set, update, and disable the cleanup policies using the GitLab API.
Examples:
-
Select all tags, keep at least 1 tag per image, clean up any tag older than 14 days, run once a month, preserve any images with the name
masterand the policy is enabled:curl --request PUT --header 'Content-Type: application/json;charset=UTF-8' --header "PRIVATE-TOKEN: <your_access_token>" --data-binary '{"container_expiration_policy_attributes":{"cadence":"1month","enabled":true,"keep_n":1,"older_than":"14d","name_regex":"","name_regex_delete":".*","name_regex_keep":".*-master"}}' 'https://gitlab.example.com/api/v4/projects/2'
See the API documentation for further details: Edit project.
Use with external container registries
When using an external container registry, running a cleanup policy on a project may have some performance risks. If a project runs a policy to remove thousands of tags the GitLab background jobs may get backed up or fail completely. It is recommended you only enable container cleanup policies for projects that were created before GitLab 12.8 if you are confident the number of tags being cleaned up is minimal.
Troubleshooting cleanup policies
If you see the following message:
"Something went wrong while updating the cleanup policy."
Check the regex patterns to ensure they are valid.
You can use Rubular to check your regex. View some common regex pattern examples.
Use the Container Registry to store Helm Charts
With the launch of Helm v3, you can use the Container Registry to store Helm Charts. However, due to the way metadata is passed and stored by Docker, it is not possible for GitLab to parse this data and meet performance standards. This epic updates the architecture of the Container Registry to support Helm Charts.
You can read more about the above challenges here.
Limitations
- Moving or renaming existing Container Registry repositories is not supported once you have pushed images, because the images are signed, and the signature includes the repository name. To move or rename a repository with a Container Registry, you must delete all existing images.
- Prior to GitLab 12.10, any tags that use the same image ID as the
latesttag are not deleted by the cleanup policy.
Troubleshooting the GitLab Container Registry
Docker connection error
A Docker connection error can occur when there are special characters in either the group, project or branch name. Special characters can include:
- Leading underscore
- Trailing hyphen/dash
To get around this, you can change the group path, change the project path or change the branch name.
Troubleshoot as a GitLab server admin
Troubleshooting the GitLab Container Registry, most of the times, requires administrator access to the GitLab server.
Read how to troubleshoot the Container Registry.
Unable to change path or transfer a project
If you try to change a project's path or transfer a project to a new namespace, you may receive one of the following errors:
- "Project cannot be transferred, because tags are present in its container registry."
- "Namespace cannot be moved because at least one project has tags in container registry."
This issue occurs when the project has images in the Container Registry. You must delete or move these images before you can change the path or transfer the project.
The following procedure uses these sample project names:
- For the current project:
gitlab.example.com/org/build/sample_project/cr:v2.9.1 - For the new project:
gitlab.example.com/new_org/build/new_sample_project/cr:v2.9.1
Use your own URLs to complete the following steps:
-
Download the Docker images on your computer:
docker login gitlab.example.com docker pull gitlab.example.com/org/build/sample_project/cr:v2.9.1 -
Rename the images to match the new project name:
docker tag gitlab.example.com/org/build/sample_project/cr:v2.9.1 gitlab.example.com/new_org/build/new_sample_project/cr:v2.9.1 -
Delete the images in both projects by using the UI or API. There may be a delay while the images are queued and deleted.
-
Change the path or transfer the project by going to Settings > General and expanding Advanced.
-
Restore the images:
docker push gitlab.example.com/new_org/build/new_sample_project/cr:v2.9.1
Follow this issue for details.