GitLab Maven Repository
- Introduced in GitLab Premium 11.3.
- Moved to GitLab Core in 13.3.
With the GitLab Maven Repository, every project can have its own space to store its Maven artifacts.
Enabling the Maven Repository
NOTE: Note: This option is available only if your GitLab administrator has enabled support for the Maven repository.
After the Packages feature is enabled, the Maven Repository is available for all new projects by default. To enable it for existing projects, or if you want to disable it:
- Navigate to your project's Settings > General > Visibility, project features, permissions.
- Find the Packages feature and enable or disable it.
- Click on Save changes for the changes to take effect.
You should then be able to see the Packages & Registries section on the left sidebar. Next, you must configure your project to authorize with the GitLab Maven repository.
Getting Started with Maven
This section covers installing Maven and building a package. This is a quickstart to help if you're new to building Maven packages. If you're already using Maven and understand how to build your own packages, move onto the next section.
Maven repositories work well with Gradle, too. Move onto getting started with Gradle if you want to setup a Gradle project.
Installing Maven
The required minimum versions are:
- Java 11.0.5+
- Maven 3.6+
Follow the instructions at maven.apache.org to download and install Maven for your local development environment. Once installation is complete, verify you can use Maven in your terminal by running:
mvn --versionYou should see something similar to the below printed in the output:
Apache Maven 3.6.1 (d66c9c0b3152b2e69ee9bac180bb8fcc8e6af555; 2019-04-04T20:00:29+01:00)
Maven home: /Users/<your_user>/apache-maven-3.6.1
Java version: 12.0.2, vendor: Oracle Corporation, runtime: /Library/Java/JavaVirtualMachines/jdk-12.0.2.jdk/Contents/Home
Default locale: en_GB, platform encoding: UTF-8
OS name: "mac os x", version: "10.15.2", arch: "x86_64", family: "mac"
Creating a project
Understanding how to create a full Java project is outside the scope of this guide but you can follow the steps below to create a new project that can be published to the GitLab Package Registry.
Start by opening your terminal and creating a directory where you would like to store the project in your environment. From inside the directory, you can run the following Maven command to initialize a new package:
mvn archetype:generate -DgroupId=com.mycompany.mydepartment -DartifactId=my-project -DarchetypeArtifactId=maven-archetype-quickstart -DinteractiveMode=falseThe arguments are as follows:
-
DgroupId: A unique string that identifies your package. You should follow the Maven naming conventions. -
DartifactId: The name of the JAR, appended to the end of theDgroupId. -
DarchetypeArtifactId: The archetype used to create the initial structure of the project. -
DinteractiveMode: Create the project using batch mode (optional).
After running the command, you should see the following message, indicating that your project has been set up successfully:
...
[INFO] ------------------------------------------------------------------------
[INFO] BUILD SUCCESS
[INFO] ------------------------------------------------------------------------
[INFO] Total time:  3.429 s
[INFO] Finished at: 2020-01-28T11:47:04Z
[INFO] ------------------------------------------------------------------------
You should see a new directory where you ran this command matching your
DartifactId parameter (in this case it should be my-project).
Getting started with Gradle
This section covers installing Gradle and initializing a Java project. This is a quickstart to help if you're new to Gradle. If you're already using Gradle and understand how to build your own packages, move onto the next section.
Installing Gradle
Installation is needed only if you want to create a new Gradle project. Follow instructions at gradle.org to download and install Gradle for your local development environment.
Verify you can use Gradle in your terminal by running:
gradle -versionIf you want to use an existing Gradle project, installation is not necessary.
Simply execute gradlew (on Linux) or gradlew.bat (on Windows) in the project
directory instead.
You should see something similar to the below printed in the output:
------------------------------------------------------------
Gradle 6.0.1
------------------------------------------------------------

Build time:   2019-11-18 20:25:01 UTC
Revision:     fad121066a68c4701acd362daf4287a7c309a0f5

Kotlin:       1.3.50
Groovy:       2.5.8
Ant:          Apache Ant(TM) version 1.10.7 compiled on September 1 2019
JVM:          11.0.5 (Oracle Corporation 11.0.5+10)
OS:           Windows 10 10.0 amd64
Creating a project in Gradle
Understanding how to create a full Java project in Gradle is outside the scope of this guide, but you can follow the steps below to create a new project that can be published to the GitLab Package Registry.
Start by opening your terminal and creating a directory where you would like to store the project in your environment. From inside the directory, you can run the following Maven command to initialize a new package:
gradle initThe output should be
Select type of project to generate:
  1: basic
  2: application
  3: library
  4: Gradle plugin
Enter selection (default: basic) [1..4]
Enter 3 to create a new Library project. The output should be:
Select implementation language:
  1: C++
  2: Groovy
  3: Java
  4: Kotlin
  5: Scala
  6: Swift
Enter 3 to create a new Java Library project. The output should be:
Select build script DSL:
  1: Groovy
  2: Kotlin
Enter selection (default: Groovy) [1..2]
Choose 1 to create a new Java Library project which is described in Groovy DSL. The output should be:
Select test framework:
  1: JUnit 4
  2: TestNG
  3: Spock
  4: JUnit Jupiter
Choose 1 to initialize the project with JUnit 4 testing libraries. The output should be:
Project name (default: test):Enter a project name or hit enter to use the directory name as project name.
Adding the GitLab Package Registry as a Maven remote
The next step is to add the GitLab Package Registry as a Maven remote. If a project is private or you want to upload Maven artifacts to GitLab, credentials must be provided for authorization too. Support is available for personal access tokens, CI job tokens, and deploy tokens only. Regular username/password credentials do not work.
Authenticating with a personal access token
To authenticate with a personal access token,
set the scope to api when creating one, and add it to your Maven or Gradle configuration
files.
Authenticating with a personal access token in Maven
Add a corresponding section to your
settings.xml file:
<settings>
  <servers>
    <server>
      <id>gitlab-maven</id>
      <configuration>
        <httpHeaders>
          <property>
            <name>Private-Token</name>
            <value>REPLACE_WITH_YOUR_PERSONAL_ACCESS_TOKEN</value>
          </property>
        </httpHeaders>
      </configuration>
    </server>
  </servers>
</settings>
Authenticating with a personal access token in Gradle
Create a file ~/.gradle/gradle.properties with the following content:
gitLabPrivateToken=REPLACE_WITH_YOUR_PERSONAL_ACCESS_TOKENAdd a repositories section to your
build.gradle
file:
repositories {
    maven {
        url "https://<gitlab-url>/api/v4/groups/<group>/-/packages/maven"
        name "GitLab"
        credentials(HttpHeaderCredentials) {
            name = 'Private-Token'
            value = gitLabPrivateToken
        }
        authentication {
            header(HttpHeaderAuthentication)
        }
    }
}
You should now be able to upload Maven artifacts to your project.
Authenticating with a CI job token
If you're using GitLab CI/CD, a CI job token can be used instead of a personal access token.
Authenticating with a CI job token in Maven
To authenticate with a CI job token, add a corresponding section to your
settings.xml file:
<settings>
  <servers>
    <server>
      <id>gitlab-maven</id>
      <configuration>
        <httpHeaders>
          <property>
            <name>Job-Token</name>
            <value>${env.CI_JOB_TOKEN}</value>
          </property>
        </httpHeaders>
      </configuration>
    </server>
  </servers>
</settings>
You can read more on how to create Maven packages using GitLab CI/CD.
Authenticating with a CI job token in Gradle
To authenticate with a CI job token, add a repositories section to your
build.gradle
file:
repositories {
    maven {
        url "https://<gitlab-url>/api/v4/groups/<group>/-/packages/maven"
        name "GitLab"
        credentials(HttpHeaderCredentials) {
            name = 'Job-Token'
            value = System.getenv("CI_JOB_TOKEN")
        }
        authentication {
            header(HttpHeaderAuthentication)
        }
    }
}
Authenticating with a deploy token
Introduced in GitLab Premium 13.0.
To authenticate with a deploy token,
set the scope to api when creating one, and add it to your Maven or Gradle configuration
files.
Authenticating with a deploy token in Maven
Add a corresponding section to your
settings.xml file:
<settings>
  <servers>
    <server>
      <id>gitlab-maven</id>
      <configuration>
        <httpHeaders>
          <property>
            <name>Deploy-Token</name>
            <value>REPLACE_WITH_YOUR_DEPLOY_TOKEN</value>
          </property>
        </httpHeaders>
      </configuration>
    </server>
  </servers>
</settings>
Authenticating with a deploy token in Gradle
To authenticate with a deploy token, add a repositories section to your
build.gradle
file:
repositories {
    maven {
        url "https://<gitlab-url>/api/v4/groups/<group>/-/packages/maven"
        name "GitLab"
        credentials(HttpHeaderCredentials) {
            name = 'Deploy-Token'
            value = '<deploy-token>'
        }
        authentication {
            header(HttpHeaderAuthentication)
        }
    }
}
Configuring your project to use the GitLab Maven repository URL
To download and upload packages from GitLab, you need a repository and
distributionManagement section in your pom.xml file. If you're following the
steps from above, then you must add the following information to your
my-project/pom.xml file.
Depending on your workflow and the amount of Maven packages you have, there are 3 ways you can configure your project to use the GitLab endpoint for Maven packages:
- Project level: Useful when you have few Maven packages which are not under the same GitLab group.
- Group level: Useful when you have many Maven packages under the same GitLab group.
- Instance level: Useful when you have many Maven packages under different GitLab groups or on their own namespace.
NOTE: Note:
In all cases, you need a project specific URL for uploading a package in
the distributionManagement section.
Project level Maven endpoint
The example below shows how the relevant repository section of your pom.xml
would look like in Maven:
<repositories>
  <repository>
    <id>gitlab-maven</id>
    <url>https://gitlab.com/api/v4/projects/PROJECT_ID/packages/maven</url>
  </repository>
</repositories>
<distributionManagement>
  <repository>
    <id>gitlab-maven</id>
    <url>https://gitlab.com/api/v4/projects/PROJECT_ID/packages/maven</url>
  </repository>
  <snapshotRepository>
    <id>gitlab-maven</id>
    <url>https://gitlab.com/api/v4/projects/PROJECT_ID/packages/maven</url>
  </snapshotRepository>
</distributionManagement>
The corresponding section in Gradle would look like this:
repositories {
    maven {
        url "https://gitlab.com/api/v4/projects/PROJECT_ID/packages/maven"
        name "GitLab"
    }
}
The id must be the same with what you
defined in settings.xml.
Replace PROJECT_ID with your project ID which can be found on the home page
of your project.
If you have a self-managed GitLab installation, replace gitlab.com with your
domain name.
NOTE: Note:
For retrieving artifacts, you can use either the
URL encoded path of the project
(e.g., group%2Fproject) or the project's ID (e.g., 42). However, only the
project's ID can be used for uploading.
Group level Maven endpoint
Introduced in GitLab Premium 11.7.
If you rely on many packages, it might be inefficient to include the repository section
with a unique URL for each package. Instead, you can use the group level endpoint for
all your Maven packages stored within one GitLab group. Only packages you have access to
are available for download.
The group level endpoint works with any package names, which means the you have the flexibility of naming compared to instance level endpoint. However, GitLab does not guarantee the uniqueness of the package names within the group. You can have two projects with the same package name and package version. As a result, GitLab serves whichever one is more recent.
The example below shows how the relevant repository section of your pom.xml
would look like. You still need a project specific URL for uploading a package in
the distributionManagement section:
<repositories>
  <repository>
    <id>gitlab-maven</id>
    <url>https://gitlab.com/api/v4/groups/GROUP_ID/-/packages/maven</url>
  </repository>
</repositories>
<distributionManagement>
  <repository>
    <id>gitlab-maven</id>
    <url>https://gitlab.com/api/v4/projects/PROJECT_ID/packages/maven</url>
  </repository>
  <snapshotRepository>
    <id>gitlab-maven</id>
    <url>https://gitlab.com/api/v4/projects/PROJECT_ID/packages/maven</url>
  </snapshotRepository>
</distributionManagement>
For Gradle, the corresponding repositories section would look like:
repositories {
    maven {
        url "https://gitlab.com/api/v4/groups/GROUP_ID/-/packages/maven"
        name "GitLab"
    }
}
The id must be the same with what you
defined in settings.xml.
Replace my-group with your group name and PROJECT_ID with your project ID
which can be found on the home page of your project.
If you have a self-managed GitLab installation, replace gitlab.com with your
domain name.
NOTE: Note:
For retrieving artifacts, you can use either the
URL encoded path of the group
(e.g., group%2Fsubgroup) or the group's ID (e.g., 12).
Instance level Maven endpoint
Introduced in GitLab Premium 11.7.
If you rely on many packages, it might be inefficient to include the repository section
with a unique URL for each package. Instead, you can use the instance level endpoint for
all maven packages stored in GitLab and the packages you have access to are available
for download.
Note that only packages that have the same path as the project are exposed via the instance level endpoint.
| Project | Package | Instance level endpoint available |
|---|---|---|
foo/bar |
foo/bar/1.0-SNAPSHOT |
Yes |
gitlab-org/gitlab |
foo/bar/1.0-SNAPSHOT |
No |
gitlab-org/gitlab |
gitlab-org/gitlab/1.0-SNAPSHOT |
Yes |
The example below shows how the relevant repository section of your pom.xml
would look like. You still need a project specific URL for uploading a package in
the distributionManagement section:
<repositories>
  <repository>
    <id>gitlab-maven</id>
    <url>https://gitlab.com/api/v4/packages/maven</url>
  </repository>
</repositories>
<distributionManagement>
  <repository>
    <id>gitlab-maven</id>
    <url>https://gitlab.com/api/v4/projects/PROJECT_ID/packages/maven</url>
  </repository>
  <snapshotRepository>
    <id>gitlab-maven</id>
    <url>https://gitlab.com/api/v4/projects/PROJECT_ID/packages/maven</url>
  </snapshotRepository>
</distributionManagement>
The corresponding repositories section in Gradle would look like:
repositories {
    maven {
        url "https://gitlab.com/api/v4/packages/maven"
        name "GitLab"
    }
}
The id must be the same with what you
defined in settings.xml.
Replace PROJECT_ID with your project ID which can be found on the home page
of your project.
If you have a self-managed GitLab installation, replace gitlab.com with your
domain name.
NOTE: Note:
For retrieving artifacts, you can use either the
URL encoded path of the project
(e.g., group%2Fproject) or the project's ID (e.g., 42). However, only the
project's ID can be used for uploading.
Uploading packages
Once you have set up the remote and authentication and configured your project, test to upload a Maven artifact from a project of yours.
Upload using Maven
mvn deployIf the deploy is successful, you should see the build success message again:
...
[INFO] BUILD SUCCESS
...
You should also see that the upload was uploaded to the correct registry:
Uploading to gitlab-maven: https://gitlab.com/api/v4/projects/PROJECT_ID/packages/maven/com/mycompany/mydepartment/my-project/1.0-SNAPSHOT/my-project-1.0-20200128.120857-1.jarUpload using Gradle
Add the Gradle plugin maven-publish to the plugins section:
plugins {
    id 'java'
    id 'maven-publish'
}
Add a publishing section:
publishing {
    publications {
        library(MavenPublication) {
            from components.java
        }
    }
    repositories {
        maven {
            url "https://gitlab.com/api/v4/projects/<PROJECT_ID>/packages/maven"
            credentials(HttpHeaderCredentials) {
                name = "Private-Token"
                value = gitLabPrivateToken // the variable resides in ~/.gradle/gradle.properties
            }
            authentication {
                header(HttpHeaderAuthentication)
            }
        }
    }
}
Replace PROJECT_ID with your project ID which can be found on the home page
of your project.
Run the publish task:
gradle publishYou can then navigate to your project's Packages & Registries page and see the uploaded artifacts or even delete them.
Installing a package
Installing a package from the GitLab Package Registry requires that you set up the remote and authentication as above. Once this is completed, there are two ways to install a package.
Install using Maven with mvn install
Add the dependency manually to your project pom.xml file. To add the example
created above, the XML would look like:
<dependency>
  <groupId>com.mycompany.mydepartment</groupId>
  <artifactId>my-project</artifactId>
  <version>1.0-SNAPSHOT</version>
</dependency>
Then, inside your project, run the following:
mvn installProvided everything is set up correctly, you should see the dependency downloaded from the GitLab Package Registry:
Downloading from gitlab-maven: http://gitlab.com/api/v4/projects/PROJECT_ID/packages/maven/com/mycompany/mydepartment/my-project/1.0-SNAPSHOT/my-project-1.0-20200128.120857-1.pom
Install using Maven with mvn dependency:get
The second way to install packages is to use the Maven commands directly. Inside your project directory, run:
mvn dependency:get -Dartifact=com.nickkipling.app:nick-test-app:1.1-SNAPSHOTYou should see the same downloading message confirming that the project was retrieved from the GitLab Package Registry.
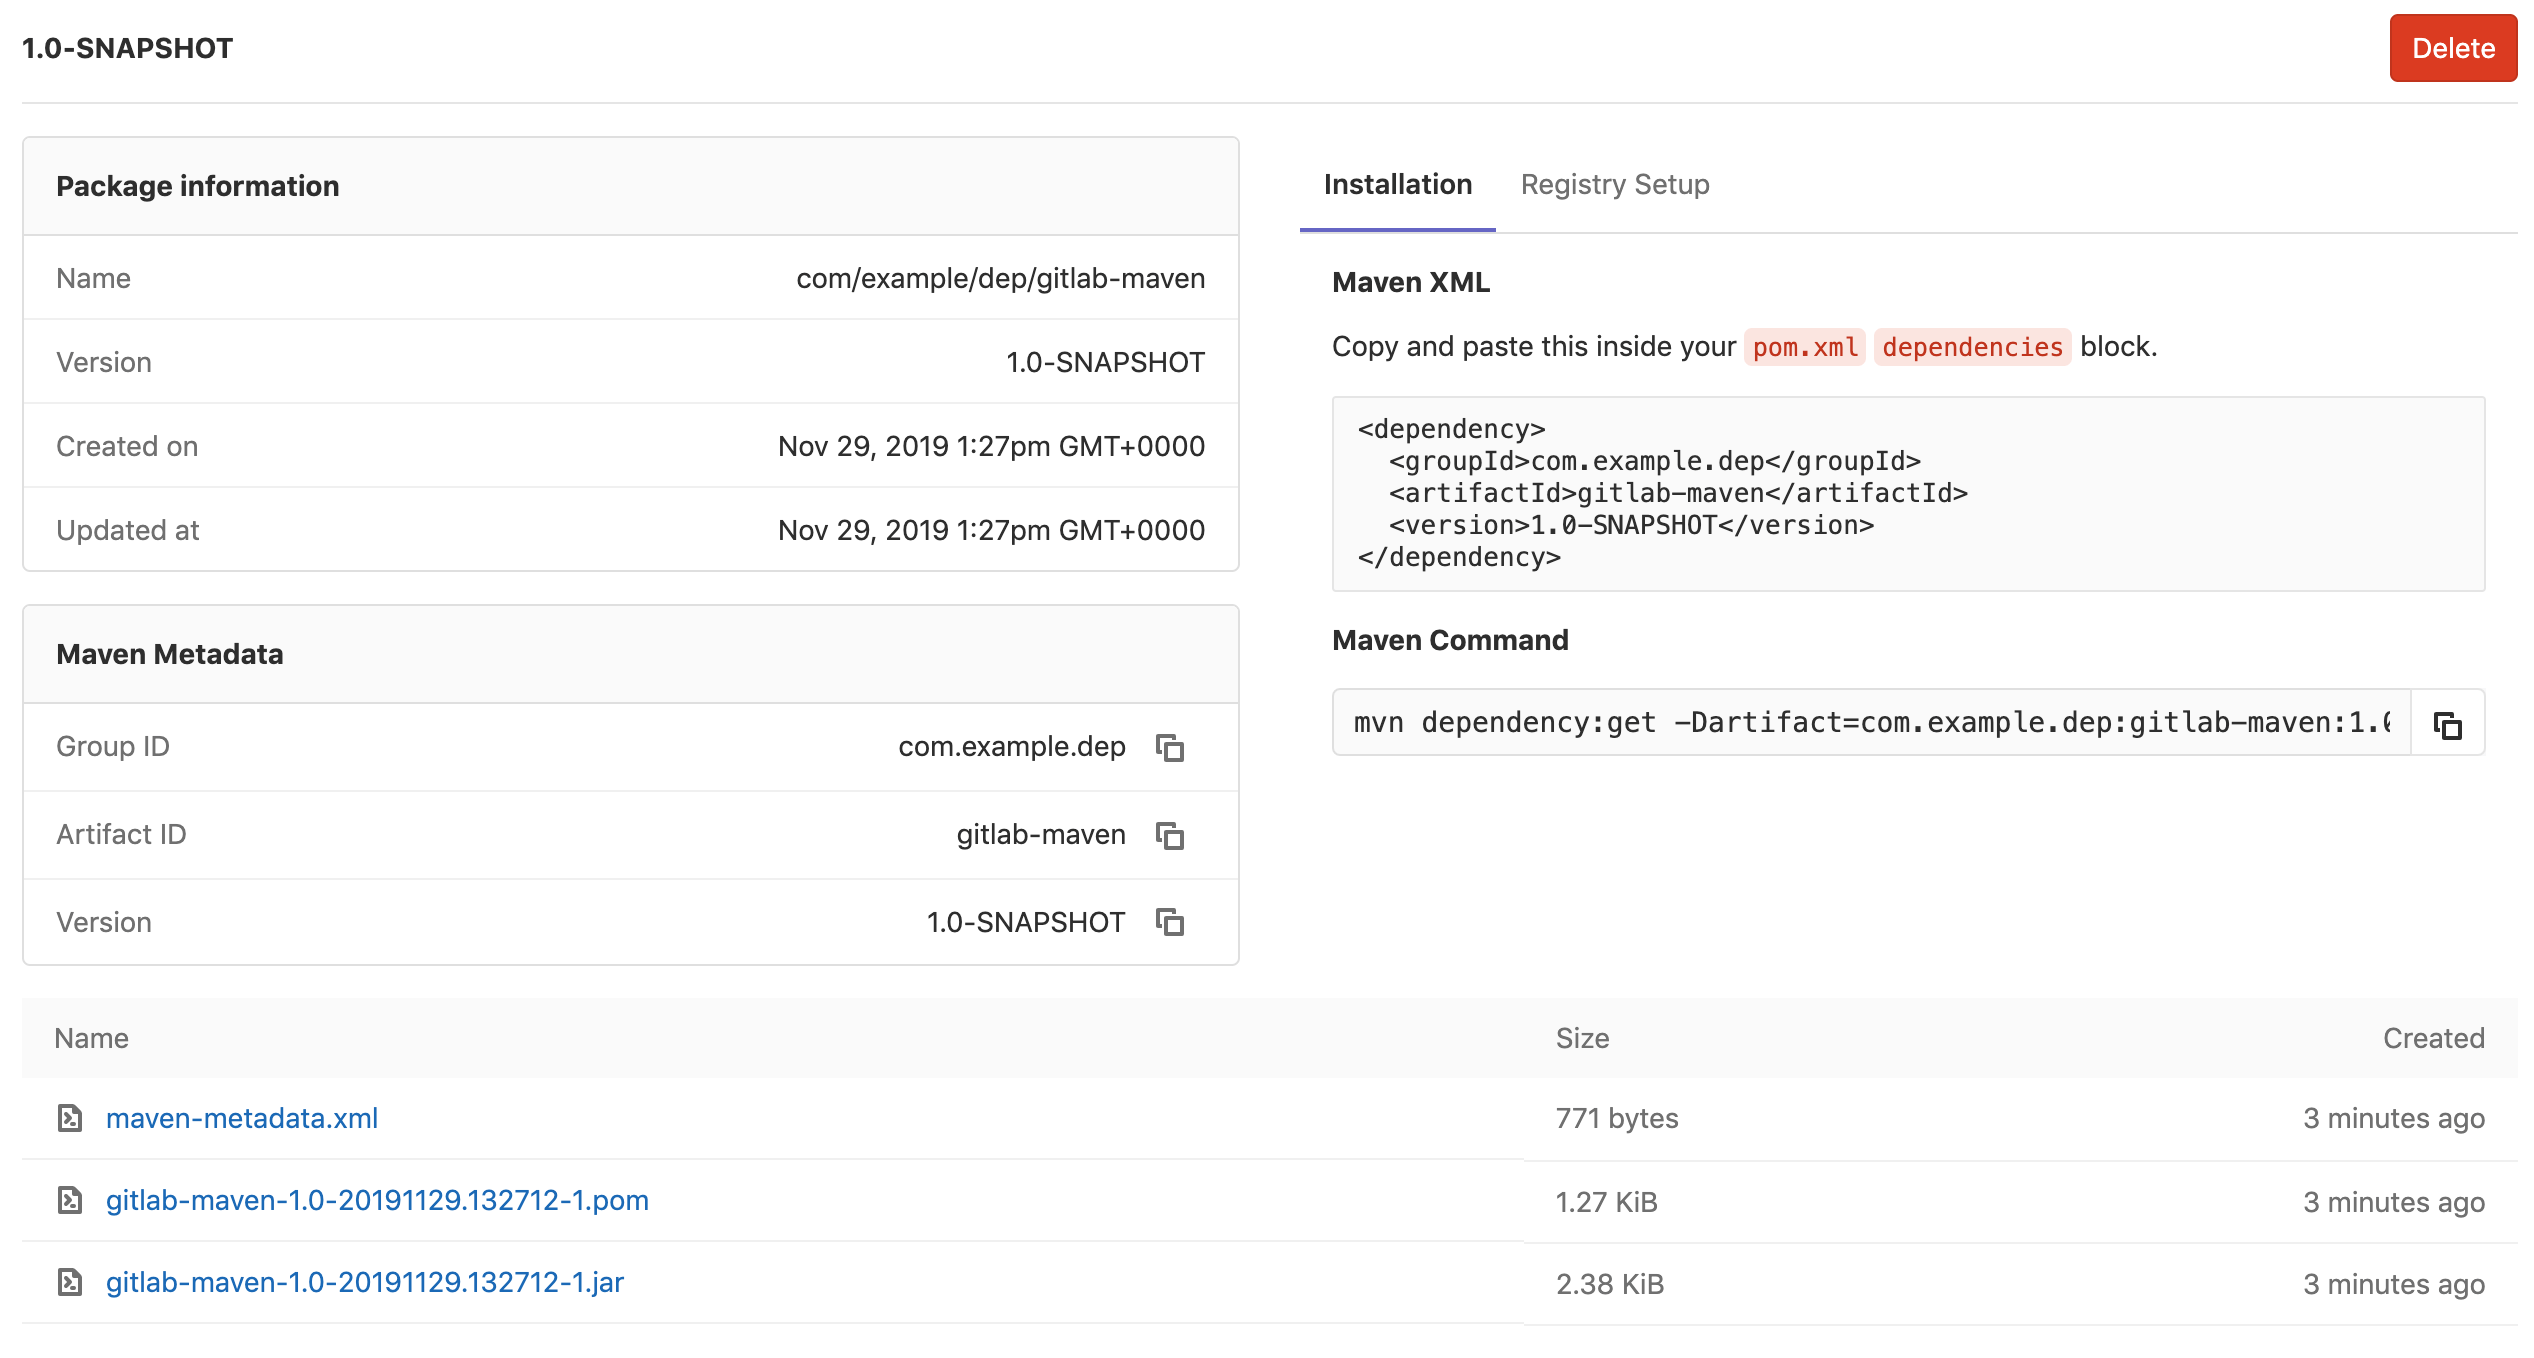
TIP: Tip: Both the XML block and Maven command are readily copy and pastable from the Package details page, allowing for quick and easy installation.
Install using Gradle
Add a dependency to build.gradle in the dependencies section:
dependencies {
    implementation 'com.mycompany.mydepartment:my-project:1.0-SNAPSHOT'
}
Removing a package
In the packages view of your project page, you can delete packages by clicking the red trash icons or by clicking the Delete button on the package details page.
Creating Maven packages with GitLab CI/CD
Once you have your repository configured to use the GitLab Maven Repository, you can configure GitLab CI/CD to build new packages automatically.
Creating Maven packages with GitLab CI/CD using Maven
The example below shows how to create a new package each time the master branch
is updated:
-
Create a
ci_settings.xmlfile that serves as Maven'ssettings.xmlfile. Add the server section with the same ID you defined in yourpom.xmlfile. For example, in our case it'sgitlab-maven:<settings xmlns="http://maven.apache.org/SETTINGS/1.1.0" xmlns:xsi="http://www.w3.org/2001/XMLSchema-instance" xsi:schemaLocation="http://maven.apache.org/SETTINGS/1.1.0 http://maven.apache.org/xsd/settings-1.1.0.xsd"> <servers> <server> <id>gitlab-maven</id> <configuration> <httpHeaders> <property> <name>Job-Token</name> <value>${env.CI_JOB_TOKEN}</value> </property> </httpHeaders> </configuration> </server> </servers> </settings> -
Make sure your
pom.xmlfile includes the following:<repositories> <repository> <id>gitlab-maven</id> <url>https://gitlab.com/api/v4/projects/${env.CI_PROJECT_ID}/packages/maven</url> </repository> </repositories> <distributionManagement> <repository> <id>gitlab-maven</id> <url>https://gitlab.com/api/v4/projects/${env.CI_PROJECT_ID}/packages/maven</url> </repository> <snapshotRepository> <id>gitlab-maven</id> <url>https://gitlab.com/api/v4/projects/${env.CI_PROJECT_ID}/packages/maven</url> </snapshotRepository> </distributionManagement>TIP: Tip: You can either let Maven utilize the CI environment variables or hardcode your project's ID.
-
Add a
deployjob to your.gitlab-ci.ymlfile:deploy: image: maven:3.6-jdk-11 script: - 'mvn deploy -s ci_settings.xml' only: - master -
Push those files to your repository.
The next time the deploy job runs, it copies ci_settings.xml to the
user's home location (in this case the user is root since it runs in a
Docker container), and Maven uses the configured CI
environment variables.
Creating Maven packages with GitLab CI/CD using Gradle
The example below shows how to create a new package each time the master branch
is updated:
-
Make sure you use the Job-Token authentication as described in "Authenticating with a CI job token in Gradle".
-
Add a
deployjob to your.gitlab-ci.ymlfile:deploy: image: gradle:6.5-jdk11 script: - 'gradle publish' only: - master -
Push those files to your repository.
Version validation
The version string is validated using the following regex.
\A(\.?[\w\+-]+\.?)+\zYou can play around with the regex and try your version strings on this regular expression editor.
Troubleshooting
Review network trace logs
If you are having issues with the Maven Repository, you may want to review network trace logs.
For example, try to run mvn deploy locally with a PAT token and use these options:
mvn deploy \
-Dorg.slf4j.simpleLogger.log.org.apache.maven.wagon.providers.http.httpclient=trace \
-Dorg.slf4j.simpleLogger.log.org.apache.maven.wagon.providers.http.httpclient.wire=trace
CAUTION: Caution: When you set these options, all network requests are logged and a large amount of output is generated.
Useful Maven command-line options
There are some Maven command-line options that may be useful when performing tasks with GitLab CI/CD.
-
File transfer progress can make the CI logs hard to read. Option
-ntp,--no-transfer-progresswas added in 3.6.1. Alternatively, look at-B,--batch-modeor lower level logging changes. -
Specify where to find the POM file (
-f,--file):package: script: - 'mvn --no-transfer-progress -f helloworld/pom.xml package' -
Specify where to find the user settings (
-s,--settings) instead of the default location. There's also a-gs,--global-settingsoption:package: script: - 'mvn -s settings/ci.xml package'
Verifying your Maven settings
If you encounter issues within CI that relate to the settings.xml file, it might be useful
to add an additional script task or job to
verify the effective settings.
The help plugin can also provide system properties, including environment variables:
mvn-settings:
  script:
    - 'mvn help:effective-settings'

package:
  script:
    - 'mvn help:system'
    - 'mvn package'